The Digital Backdrop

So back to the computer. I’ve actually been spending more time on the computer than on costumes. I want to kinda walk through the progression of the background image for this year’s picture, and how it progressed from a concept through completion.

Without further adieu, feast your eyes upon this masterwork of draftsmanship and design. Behold the flowing lines. Marvel at the intricate detail. Feel the warm tones brighten your very soul.

Concept.jpg

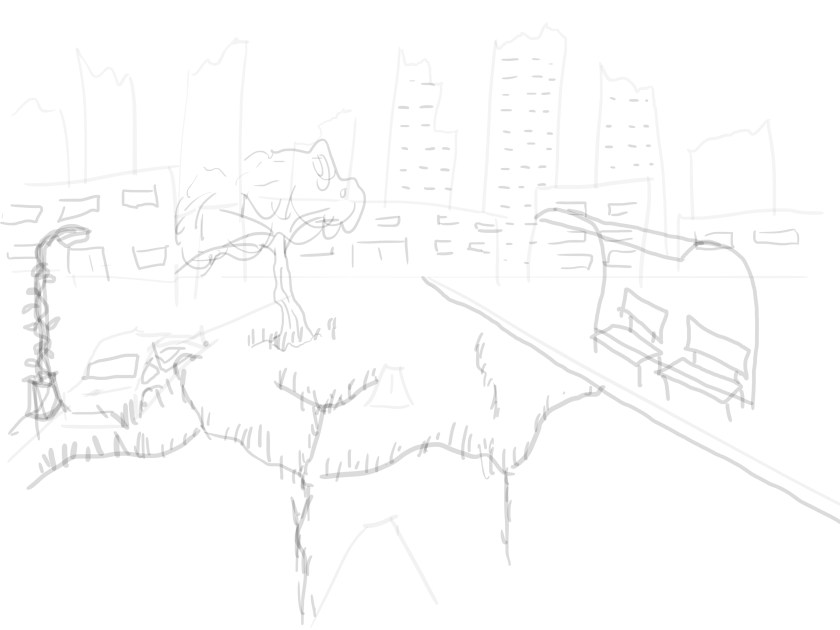
Sorry, I was thinking of something else. This drawing is pretty crappy. BUT. It’s good enough. We see that we have a city street with a bust stop, a broken down car, a lamp post that is covered in vines, and the street is cracked and there is grass and trees taking advantage of said cracks. You will see that that stays pretty consistant throughout. And while the location remains the same, it does end up with quite a different feel than what I originally had in mind.

The “feel” in question I had originally though of as very similar to Fallout. Here’s a promotional image for Fallout 4:

Fusion x64 TIFF File

As you can see, the guys at Bethesda are really great at world building. There is tons of detail everywhere, lots of visual story telling, and the world looks very “lived in”. However, it’s all very…. brown. So as I was working on this, I remembered that I hate that about Fallout. It’s great at first, but after you’ve spent 50 hours exploring the wasteland, it starts to wear on you. And as this picture will eventually be hanging on my wall, I’d like something a little more pleasing to the eye. So I decided to go green. I’m so woke.

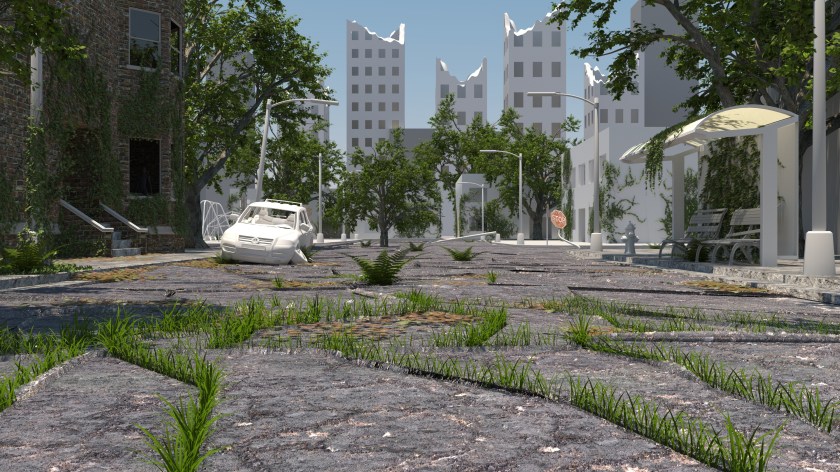
So with that in mind, here’s the first 3d blockout of the scene, complete with vegitation, including grass, trees, ivy, and ferns. Usually that would be something you add at the end, but since it’s so integral to the feel of the image, I put it in early. If you’ve been following along, you might notice the bus station and street lights I modeled in an earlier post. No textures yet, just getting a feel for the scene. The buildings are mostly just cubes, except for the one on the left, and the skyscrapers, which have a little more detail but are still just placeholder. But I’m liking where this is going.

BKGD1

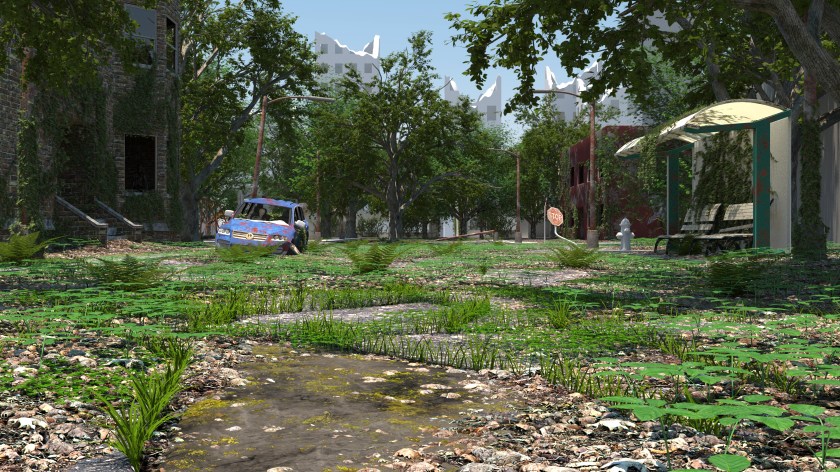
Now we’ve fleshed things out a bit more. I’ve added some detail to the building on the left, in the form of some stairs and a doorway. I’ve added some ivy to the lamp post on the left. Playing around with the street some more. Still not happy with it. We’ve added a fire hydrant, a swing set and a climby dome thingy, some stop signs, fleshed out some of the buildings some more, added a brick texture to our apartment building. It’s coming along.

BKGD3

I textured another building, a added a different type of tree to the scene, textured some of the car. Added a skeleton to the passenger seat of the car. Things are looking good, but the ground is really still bothering me. The ground is literally half the image, and it’s the closest thing to the camera, so it’s gotta look good. I modeled some clovers, and I felt that was a step in the right direction. Then I was messing around with the texture on the closest chunk of street, and I liked it, but it wasn’t not enough. Something was still wrong.

BKGD 5

Luckily I figured it out. So I did some thinking, and I realized that for trees to grow that big in the middle of the street, it would have to be decades after the collapse. in that time, there would be tons of leaves built up with no one to get rid of them. With all that mulch turning into soil, you’d end up with a veritable forest floor. So that’s where I went with it. I looked at lots of reference of hardwood forests, and I came up with something that I’m really happy with. There’s leaves everywhere, clovers, and sarsaparilla, which is that leafy ground cover plant you see everywhere. Now we’re talking.

BKGD 6

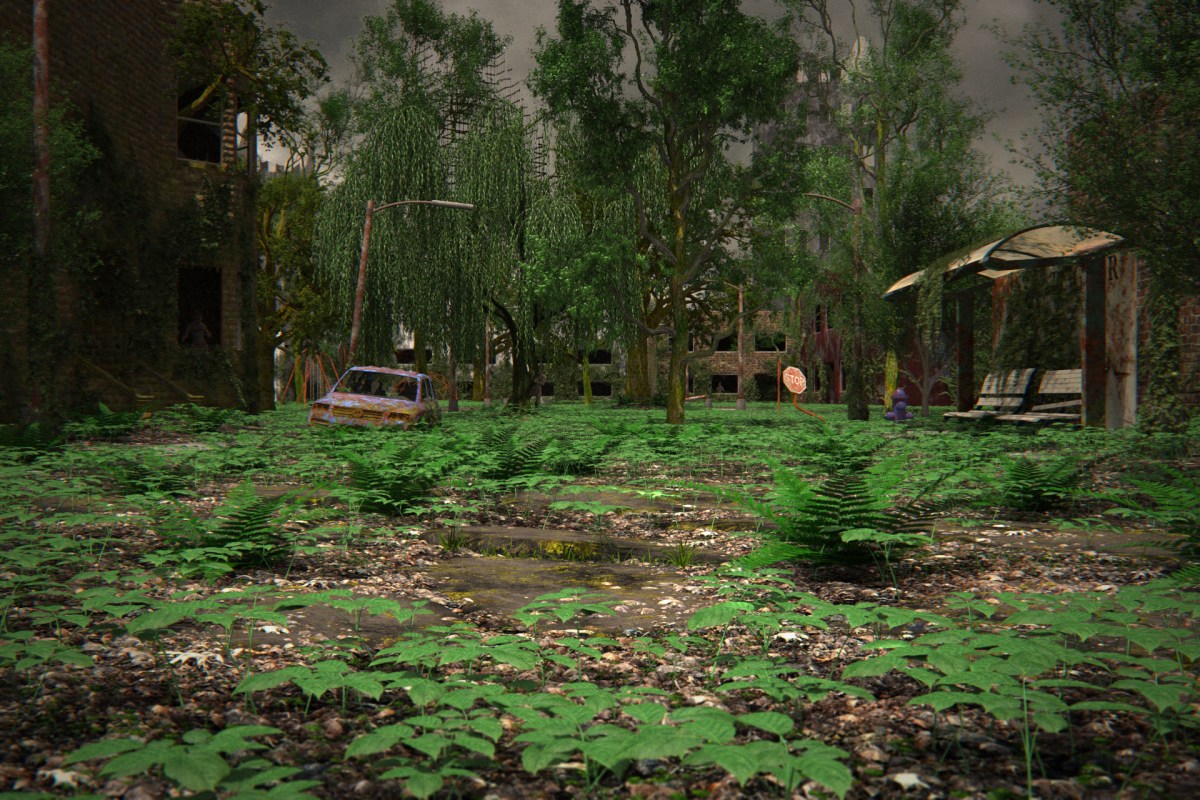
I decided to go a little darker with the mood by making it overcast, and an angry looking sky. I set up a system that randomly generates the plants at render time. It looks better and is uses significantly less memory. Once I get the photos of us done, I may tweak a few things, depending on the composition turns out, but for now, I’m calling it done. Put a fork in it.BKGD13

Very Distressing

In the apocalypse, no one washes their clothes. They’ve got more important things to worry about. Like how to keep the zombie hoard from chewing on your face, or how to keep your 12″ mohawk up when there is no more gel.

Today we will learn a method of making clothes look super dirty and worn. You can also use this method to turn new jeans into old looking jeans, and then flip them for a huge profit, like Nordstroms

Today I did a pair of pants for Braxton, and a jacket for me. First step was to find a pair of pants, preferably cargo pants (you’ll need lots of pockets if you want to survive) at a thrift store, and I got the jacket from Wish. It’s a website/app where you can buy stuff directly from China. The upside is it’s super cheap. The downside is that it takes a long time to get here, the sizes are always off, and it’s never as good as it looks in the picture.Screenshot 2017-08-17 22.17.25

In the picture it looked like it was a canvas material. Turns out it’s really crappy polyester. It’s fine since it’s just for a costume, but if this were the real apocalypse… I shudder to think of my fate. Before I could do anything, I had to cut off these stupid cuffs. +10 points for effort, China, but I’m gonna call this one a fail.

20170807_200446

Anyways. First step is to rough them up. They will need nicks, cuts, etc. to sell it. I used the edge of a serrated pocket knife to get the job done.

20170807_191528

Spend extra time wearing the spots where it would naturally be worn, like down by the heels, on the knees, by the pockets, ect. Then I put in an actual cut so that I could so it up.

20170807_192958

The fact that my sewing is terrible really helps to sell the effect.

20170807_193555

Now that this is all sewn up, this boy is ready for the dirt. I repeated this with my jacket.

20170807_202930

The first step is to put on some gloves and dip my hands in black paint. Then I kida scrunch up the pants and get a little paint on there, gently so it doesn’t really build up. just a little here and there.

20170809_192744

Then- you know it- I rubbed some dirt on it. The dirt will stick to where the paint is. You can see that jar there with the white powder- that’s cocaine. But I also have another jar that is not picture that is diatomaceous earth. Any white powder will do. I sprinkle some of that here and there to give it some highlights.

20170809_192521_002

Once that is all done, I hit it with some matte clear coat, which helps trap the dirt in there, so it doesn’t just fly out when you dust off your pants.

20170809_194519

Here’s a before and after on these pants.

20170807_194324

Here’s some pants for me and for Raegan that I did.


So it’s a pretty cool technique, one that I can’t take credit for myself. I learned this one from Nuclear Snail, a really cool Youtube channel all about Post-Apoc costplay. Check it out.

Badland Beatdown

Sorry it’s been so long. I’ve been hard at work and taking lots of pictures, just haven’t found the time to get it on the blog. But here we go. Today I’m showing you how I made 2 mean looking melee weapons. Whether it’s zombies, terminators, raiders, or white supremacists (too soon?), you’ll be ready to dance when you’re rocking one of these.

20170817_194655 Edited

My first step was to acquire a wooden baseball bat and an axe handle. After checking every thrift store in town, and asking around on facebook and coming up short, I bit the bullet and had to buy them new. I spent around $30 for both of them, the bat from a Big 5, and the axe handle from Ace’s. Also acquired from Ace was the hardware I needed. Say “Hi”! I sanded his eyeballs so that they would rust better… We’re not on great terms at the moment…
20170808_221212

Next step was to sand off all that shine. Nothing is shiny after the apocalypse.

20170809_173816

For the axe handle, It wasn’t lacquered, so no need to sand, but I did want to make it look old. So what I did is I put on some rubber gloves, dipped my hands in some black paint, and rubbed it all over the bat. Then quickly before it dried I sprayed it off with the hose. The black paint stayed in the grains but washed off everywhere else. It was a pretty nice effect. I won’t tell you about how initially I thought I would paint it black, then immediately regretted it and tried to wash it off, and that the resulting effect was just a happy accident.

20170815_184004

While I was doing this, my hardware was rusting away in our vinegar, salt, and hydrogen peroxide solution.

20170809_081823

Next step for the bat was to drive the nails through the bat. They are much too big and would split the wood, so first I drilled holes. Then I hammered the nails in. I initially thought I would cut off the nail heads and sharpen them to match the other end, but I decided I like the look of it with the nail heads still on. It looks more barbaric. Remember: the mutants are no longer human. They show no sympathy and deserve none in return.

20170809_190028

Here I’ve finished driving all the nails. I was going to do 2 more, but I broke my drill bit. >_<   Not pictured here, but I then sprayed some matte clear coat on the bad, and then rubbed some dirt on it. The clear coat helps the dirt to stick, so it looks dirty. Because there’s a lot more dirt after the collapse. No more street sweepers, you see.

20170809_201242

Next step was to wrap them with grip tape. I got a roll of it on amazon. Goes on real easy, and really gives a nice grip.

20170815_190114

Then of course, I rubbed some dirt on it.

20170815_190400

Then I drilled a hole in the axe head, and attached the circular saw blades with a nut, bolt, and washers. The hole was a little small so I had to use a wrench to get the bolt in.

20170815_185429

Here I can be seen wrapping the bat in barbed wire. There was this kid out riding his bike and he kept riding back and forth in front of my house, sneaking glances at me. Can’t say I blame him. Neighbors probably think I’ve joined Antifa.

20170816_185305

So here’s a close up of the finished bat. I think I’ll call it… Lucille 2. That’s a double reference. If you get both, let me know in the comments and I will love you forever.

20170817_194715

And here’s a closeup of the finished buzzsaw axe. I don’t have a name for this one. Let me know if you think of something good.

20170817_194729

That’s if for this episode. It was a fun project, I’m happy with how they turned out. Cost me prolly $60 for all the parts, but that would have been a lot less if I had managed to find more parts used. But such is crafting. Let me know what you think. Don’t forget to subscribe or share or something. Make yourself useful.

20170817_194655